Log in to the application as administrator (use ”admin” as user name).
On the main view click on the Options icon.
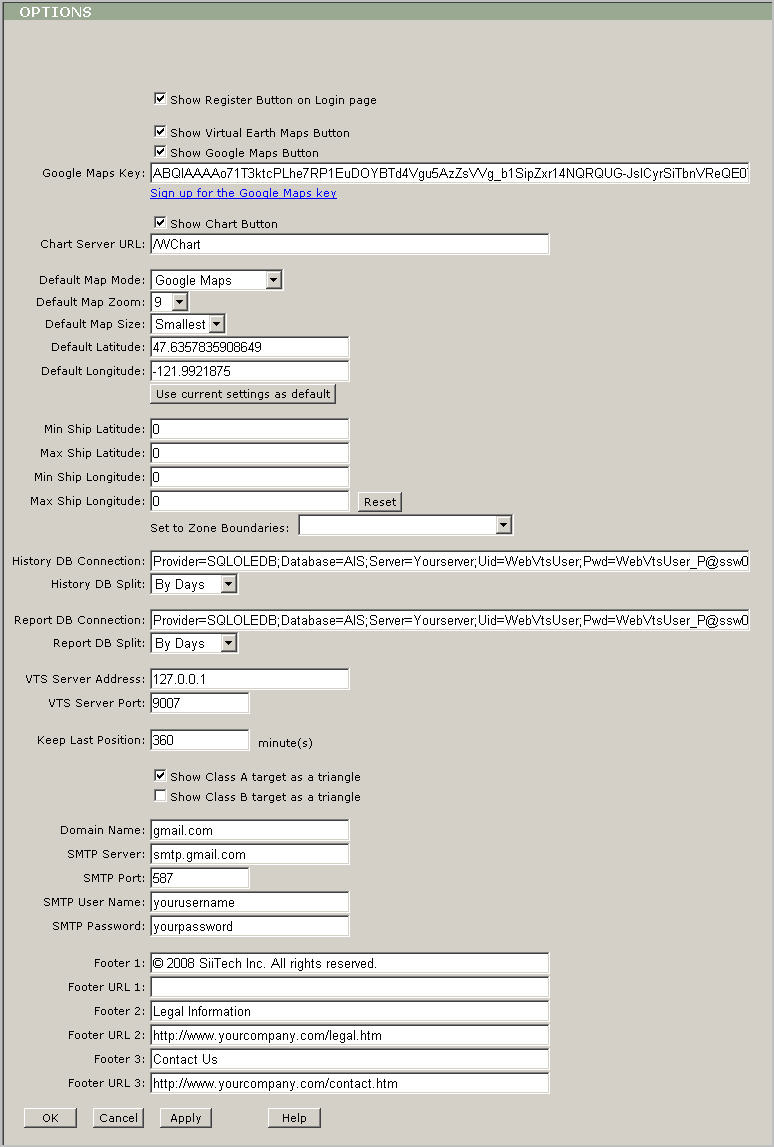
Select the Show Register Button on Login page box to allow new users to register on your website.
Select the Show Virtual Earth Maps Button box to allow users to use Microsoft Virtual Earth maps.
Select the Show Google Maps Button box to allow users to use Google Maps. If Google Maps are enabled, enter a Google Maps key into the Google Maps Key box.
Select the Show Chart Button box to allow users to use S-57 (NOAA) and BSB nautical charts. If S-57 or/and BSB nautical charts are enabled and Web Chart server is installed on a computer other than your Web VTS computer, enter the Web Chart server URL into the Charts Server URL box.
Use the Default Map Mode drop list to select the default map type.
Use the Default Map Zoom drop list to select the default zoom level.
Use the Default Map Size drop list to select the default map/chart size.
Use the Default Latitude and Default Longitude boxes to set coordinates of the default location.
Note: You may use the Set current settings as default
button to set default map settings to your current settings.
Use the Min Ship Latitude, Max Ship Latitude, Min Ship Longitude, and Max Ship Longitude boxes to specify coordinates of your working area. All AIS messages and vessels outside this area will be ignored.
Note: You may use Reset button to reset your working area coordinates. You may use Set to Zone Boundaries drop list to calculate your working area coordinates from the selected zone coordinates.
Use the History DB Connection box to set history database connection string. This database must be specified in AIS Server’s AIS Database service. See ”AIS Server Administrator’s Guide” for more information.
Use the History DB Split drop list to select the period of time each part of history database represents. This parameter must match the Split database parameter in AIS Server’s AIS Database service, which is used to collect history data. See ”AIS Server Administrator’s Guide” for more information.
Use the Report DB Connection box to set report database connection string. This database must be specified in AIS Server’s AIS Database service. See ”AIS Server Administrator’s Guide” for more information.
Use the Report DB Split drop list to select the period of time each part of report database represents. This parameter must match the Split database parameter in AIS Server’s AIS Database service, which is used to collect report data. See ”AIS Server Administrator’s Guide” for more information.
Use the VTS Server Address box to set the IP address of the computer where AIS Server’s VTS Server service is running. This value is usually 127.0.0.1.
Use the VTS Server Port box to set the port number used by AIS Server’s VTS Server service. This value is usually 9007.
Use the Keep Last Position box to set the number of days the last red ship’s position must be shown on the screen after the ship’s transponder is turned off.
Check the Show Class A target as a triangle box to show ships equipped with Class A transponders as triangles.
Check the Show Class B target as a triangle box to show ships equipped with Class B transponders as triangles.
Use the Doman Name box to set the domain name of your website. This name is used to find a mail server to send notification e-mail messages.
Use the SMTP
Server box to specify your SMTP server. This server is used to
send notification e-mail messages.
Use the Footer 1 box, the Footer URL 1 box, the Footer 2 box, the Footer URL 2 box, the Footer 3 box and the Footer URL 3 box to customize your instance of Web VTS.
Press Apply
to save changes.