
For this example, we are going to build an alarm that will be triggered when the BURRARD OTTER II SeaBus crosses "SeaBus Line L" (see below).

Click the Alarm Designer button  to open the Alarm
Designer.
to open the Alarm
Designer.
Select "<New>" from the Select Alarm drop-down list.
Type “SeaBus Alarm” into the Alarm field.
Leave the Enable box checked.
Select “Middle” from the Alarm Level drop-down list.
Type “Seabus arriving” in the Message field.
Select “Blue” from the Color drop-down list.
Type "0" [minutes] into the Repeat Interval field (in this example, we are dealing with a one-time event).
Select "OR" from the Logical Operator drop-down list (in this example, only one condition must be satisfied in order to generate an alarm event).
Select “Seabus
Line L” from the Zone drop-down
list.
Note: Refer to "Line",
found under the Zone Examples heading,
for a detailed explanation on creating zones.
Leave the Filter field empty.
Select "On Enter" from the Condition 1 drop-down list.
Leave Condition 2 empty.
Leave “0” in the Min Speed field.
Leave “0” in the Max Speed field.
Leave the Do not show in Alarm Events
Window box unchecked.
Note: When an alarm event
happens (e.g. SeaBus crosses the line), the Alarm
Events window will pop-up.
Check Send
AIS Safety Message.
Note: If you have AIS transponder that has
a communication with Web VTS then you could send AIS message to any
passing AIS equipped ship.
Type any message in the AIS Message box. As an example, we have typed: “YOU HAVE ENTERED INTO A RESTRICTED ZONE. LEAVE THE RESTRICTED ZONE. COAST GUARD”.
Type an e-mail address into the Email Address field. As an example, we have typed: “coastguard@coastguard.com”.
Check Send
Email Notification Message.
Note: When an alarm event
happens (e.g. SeaBus crosses the line), an e-mail will be sent to
the provided e-mail address.
To send an SMS notification, click Send SMS using mobile provider's
Email-to-SMS gateway. Find your mobile provider's e-mail
address and type your phone number in place of "10digitnumber"
in the e-mail address template. Use semicolons (;) to separate e-mail
addresses.
Type an HTTP command in the HTTP Command field.
Leave Send
HTTP checked.
Note: When an alarm event
happens (e.g. SeaBus crosses the line), an HTTP command will be sent
to the IP Power box. In this case, we are using the IP
Power 9258 device to turn the projector ON and OFF.
Type the desired
number of minutes in the Delay field.
Note: In this case, the IP
Power device is triggered (ON) immediately because the first number
is 0. Since our second value is 1, the IP Power device will be triggered
(OFF) in 1 minute. This means that when the BURRARD OTTER II SeaBus
crosses "SeaBus Line L", the projector is turned ON right
away and subsequently turned OFF in 1 minute.
Click Apply to save changes and click OK to return to the main view.
As soon as the alarm condition occurs, the Alarm Event window will appear.
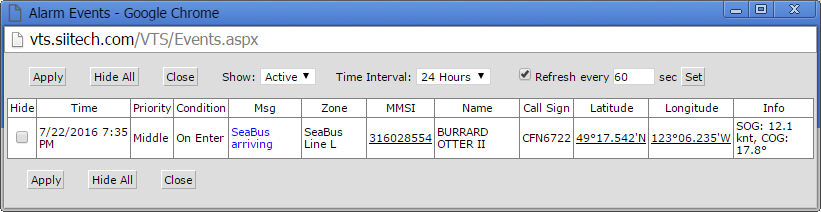
Note: If the alarm has "Middle" or "High" priority, the Alarm Event window will pop-up automatically. Check Hide and click Apply to confirm that you have read the notification. After the confirmation, the Alarm Event window will no longer pop-up until the next event.
Tip: Click Hide All to confirm multiple alarm notifications at once.
As soon as the alarm condition occurs:
