 on
the toolbar and you will see the Filter Designer window.
on
the toolbar and you will see the Filter Designer window.
Filter Designer is a power tool that allows users to select what vessels (AIS targets) to display.
To start Filter Designer click the
Filter Designer button on
the toolbar and you will see the Filter Designer window.
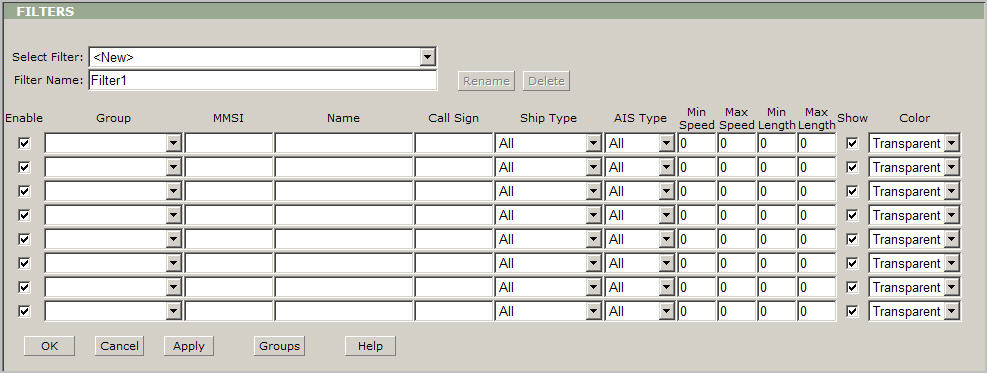
Filter Designer description:
Select Filter: Use this drop-down box to select any existing filter or create a new one.
Filter Name: Use this box to display and edit a filter’s name (by default the program uses “FilterX” name for every new filter, where X is a first available number).
Rename: Use this button to rename any existing filter.
Delete: Use this button to delete any existing filter.
Further the Filter Designer contains several identical lines; those have the same controls: the Enable check box, the Group field, the MMSI field, the Name field, the Call Sign field, the Ship Type drop-down box, the AIS Type drop-down box, the Min Speed field, the Max Speed field, the Min Length filed, the Max Length filed, the Show check box and the Color drop-down box.
Each of these lines represents a condition of the filter. The first line has the highest priority.
Enable: Leave this box checked to enable a condition.
Group: Use this field to select any predefined group.
MMSI, Name,
or Call Sign: Use these fields
to identify a desired vessel (target). Type a name of the vessel (MMSI
number, or call sign) into a corresponding field. Note:
Enter only one parameter: Name,
MMSI, or Call
Sign.
Tip:
Use
an asterisk symbol * to
specify all vessels’ names, MMSI numbers, or call signs; you can type
it in any field (MMSI, Name,
or Call Sign). Use an asterisk
symbol, if you want to apply those settings for all vessels.
Ship Type: Use this drop-down box to select a type of the vessel or dangerous cargo.
AIS Type: Use this drop-down box to select AIS targets based on AIS type (Base Station, Class A, Class B, AtoN or SAR Aircraft).
Min Speed & Max Speed: Use these fields to type minimum and maximum speed of a vessel.
Min Length & Max Length: Use these fields to type minimum and maximum length of a vessel.
Show: Leave this box checked to display the selected vessels or uncheck this box to hide vessels.
Color: Choose any desired color from this drop-down box.
OK: Click this button to save the changes and return to the main view.
Cancel: Click this button to cancel all changes and return to the main view.
Apply: Click this button to save the changes but keep the designer window open.
Groups: Click this button to open the Group Designer panel and create the group of the vessels.
Help: Click this button to open the Web VTS User’s Guide.
To build a group of vessels click the Groups button and you will see the Groups designer panel.
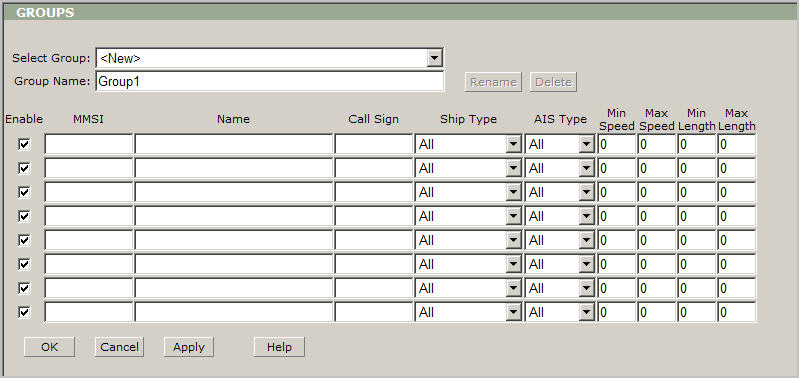
Groups Designer description:
Select Group: Use this drop-down box to select any existing group or create a new one.
Group Name: Use this box to display and edit a group’s name (by default the program uses “GroupX” name for every new group, where X is a first available number).
Rename: Use this button to rename any existing group.
Delete: Use this button to delete any existing group.
Further the Group Designer contains several identical lines; those have the same controls: the Enable check box, the MMSI field, the Name field, the Call Sign field, the Ship Type drop-down box, the AIS Type drop-down box, the Min Speed field, the Max Speed field, the Min Length filed, the Max Length filed.
Enable: Leave this box checked to include a vessel into this group.
MMSI, Name, or Call Sign: Use these fields to identify a desired vessel (target). Type a name of the vessel (MMSI number, or call sign) into a corresponding field. Note: Enter only one parameter: Name, MMSI, or Call Sign.
Ship Type: Use this drop-down box to select a type of the vessel or dangerous cargo.
AIS Type: Use this drop-down box to select AIS targets based on AIS type (Base Station, Class A, Class B, AtoN or SAR Aircraft).
Min Speed & Max Speed: Use these fields to type minimum and maximum speed of a vessel.
Min Length & Max Length: Use these fields to type minimum and maximum length of a vessel.
OK: Click this button to save the changes and return to Filter Designer.
Cancel: Click this button to cancel all changes and return to Filter Designer.
Apply: Click this button to save the changes but keep the Group Designer window open.
Help: Click this button to open the Web VTS User’s Guide.