 on
the toolbar and you will see the Route Designer window.
on
the toolbar and you will see the Route Designer window.
The primary task of the Route Designer is providing a tool to obtain ETA (estimated time of arrival) to the desired waypoint. The tool allows building a route and then user could utilize the route to get ETA to waypoints.
To start Route Designer click the
Route Designer button on
the toolbar and you will see the Route Designer window.
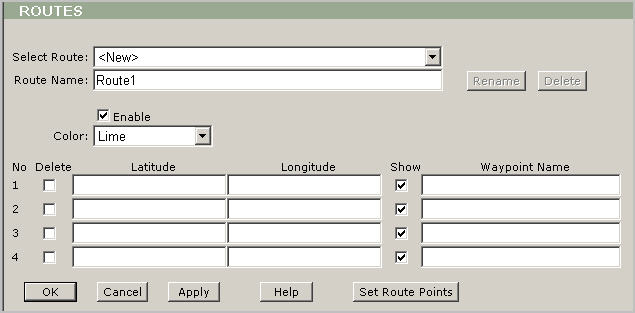
Route Designer description:
Select Route: Use this dropdown box to select any existing route or create a new one.
Route Name: Use this box to display and edit an alarm’s name (by default the program uses “RouteX” name for every new route, where X is a first available number).
Rename: Use this button to rename any existing route.
Delete: Use this button to delete any existing route.
Enable: Leave this check box checked to enable the route.
Color: Use this dropdown box to select a color of the route line.
Delete: Check this box to delete any points (latitude and longitude pairs).
Latitude
and Longitude: Type in these boxes route legs’ position.
Tip: Use
the Add Points button to simplify
this action.
Show: Uncheck this box to eliminate this waypoint from a chart/map and ETA calculation.
Waypoint Name: Type the Waypoint’s name to display it on the chart.
OK: Click this button to save the changes and return to the main view.
Cancel: Click this button to cancel all changes and return to the main view.
Apply: Click this button to save the changes but keep the designer window open.
Help: Click this button to open the Web VTS User’s Guide.
Set Route Points: Use this button to move to the chart window and locate the waypoints of the route.